|
|
|
This article describes how the legacy Windows Help (WinHlp32.exe)
can be made to function under (64-bit) Windows 10 versions.
Abstract
The proposed solution is probably not only the most obvious but also the simplest.
As it merely involves copying one or two files and a bit of registry editing,
any experienced user (and definitely all professionals), with
the necessary hard- and software, ought to be able to implement it.
Having solved the problem of the full text search, this version
(presumably the last and final version) now includes the necessary steps which
create a truly, fully functional Windows Help, that will open, display, and
function in all other aspects, exactly as under older Windows versions
(e.g. Windows 2000, Windows XP, etc.), with default/integrated support for
the .hlp file standard.
Although the procedure described below focuses mainly on using the (now) four
files from Windows Vista, perfunctory tests we performed for the first version of this article,
strongly suggest that using only the two files (WinHlp32.exe and ftsrch.dll) from earlier
Windows versions, might also work.
Background
The Windows Help functionality that was introduced in the days of 16-bit,
Windows (e.g. Windows 3.1) no longer functions under (64-bit) Windows 10.
As a result, installing and/or executing 32-bit applications that
based their help on this, legacy specification can fail.
This, essentially renders these applications unusable under Windows 10
(see remarks on Hyper-V, further below), even though, the applications
may have functioned faultlessly under all, previous, (32-bit) Windows versions
(e.g. XP, Vista, etc.).
In as far as that backward and Windows 10 compatible, successor versions of these
applcations are avaiable, this may only constitute a financial problem, but, if not,
vital data, in the files created by these applications, may become inaccessible.
We were confronted with the latter of these two scenarios.
Potential Solutions
| • |
Microsoft makes WinHlp32 updates available for Windows 10.
As the compiled Rich Text Format help specification is certaily an outdated standard
and is therefore rarely, if at all, used to author new help projects,
it is understandable that providing updates for Windows 10
is not very high up on the (Microsoft) priorities list.
Of course, this does not preclude the possibility that Microsoft, on public demand,
will eventually make such updates available, but they were not yet available,
nor had they been announced, in January of 2018.
Under these circumstances it appeared prudent to consider other solutions.
|
| • |
It is possible to use an installation package developed for an earlier
Windows version (e.g. Vista).
Unfortunately, using the Windows6.0-KB917607-x86XX.msu standalone, setup packages for Windows Vista
failed under the (64-bit) Windows 10 versions and editions , under which we made the attempt.
|
| • |
A third party software manufacturer develops executables, fully compatible with the
required file(s) and distributes them independently.
As developing an application, fully (or largely) compatible with the
existing WinHlp32 executable(s), would not only require a considerable effort on the
part of the manufacturer, it would also necessitate creating a more or less identical user interface
(i.e. the windows, menus, dialogs, and texts displayed to the user).
This could be considered a copyright infringement and
lead to costly legal disputes, particularly if license fees were charged.
In other words; without the tacit or explicit approval of Microsoft
and the support of a (multi-lingual) developer community, such a project would have little or no chance
of success.
|
| • |
Installing a spare, 32-bit, pre-Windows 10 license under Hyper-V and running the application
under that Windows version.
Unfortunately for most users, installing a legacy Windows version on the same computer as Windows 10,
has one serious drawback: It requires a setup package capable of performing this task.
Normally, this is achieved by running the Windows setup program on a
CD/ DVD.
This, then installs the necessary files on the hard disk of the target system.
However, many users have computers with pre-installed, original equipment manufactuer ( OEM)
versions.
That is, the necessary operating system files were copied to the computer's hard disk in the factory
and can therefore not be easily, if at all, installed on other hardware.
|
| • |
Patching/updating Windows 10 manually. as described below.
Depending on the circumstances, not only the sole remaining, but also the only viable
otpiion . For us, it had the additional appeal that it also promised fast results
and would save disk space, provided that the cause for the malfunccion
could be determined or at least narrowed down (quickly).
|
Breakdown
As WinHlp32.exe, that is a the 32-bit version of the original, 16-bit executable (WinHelp.exe),
is a standalone executable (i.e. it does not require a host process to be executed),
determining the underlying cause for the failure of the Windows 10 version
was not too difficult;
a simple comparison of the file's size with that of previous Windows versions
already providing an indication.
This is a mere 10 KB for the version that is installed as part of Windows 10,
as opposed to the 260 to 290 KB that are installed under
Windows 2000 through XP/2003 Server and by the updates made available for Vista.
Which, strongly suggested that the Windows 10 file does not contain the necessary
executable code.
This is further supported by the description provided
in the " File description" field on
the " Details" tab of the " Properties" dialog,
describing the file as the " Windows Winhlp32 Stub" rather than as
the " Microsoft® Help" application (as do the executables that function correctly).
Nonetheless, this left open the possibility that the Windows Help
functionality had been moved to other modules and that the Windows 10 WinHlp32.exe
now only served to forward the WinHelp function calls to these modules,
even, if in light of the size of the WinHlp32 stub and
the fact that already Vista did not include support for Windows Help,
this did not seem very likely.
It could be nearly completely ruled out, after
having compared the modules and functions imported by the
Windows 10 version to those imported by the functional executables.
At this point, it being our goal to find a solution for the problem
and not to dissect the operating system in search for its cause,
we decided to try installing the necessary file(s) by means of the
update for Vista and, as that failed, the solution described below.
Prerequisites
| • |
A spare, Windows license, preferably already installed on an unused, older computer.
We used Windows Vista (with SP 1) and the propagated solution was only comprehensively tested
with the files from this Windows version.
|
| • |
If the donor system is Windows Vista and the functional versions of the WinHlp32 files
have not yet been installed, a Windows6.0-KB917607-x86XX.msu standalone setup package.
This does not have to be the same language as either the Vista or the Windows 10 version.
|
| • |
The Windows Help, file registration, in the Windows registry of the donor system.
These are the .hlp and hlpfile keys under HKKEY_LOCAL_MACHINE\Software\Classes.
If Windows Vista is the donor system, the keys should be copied/exported after having installed
the Windows Help update (Windows6.0-KB917607-x86XX.msu ).
|
| • |
Adequate storage capacity (e.g. an external hard disk) for a complete backup of the Windows 10 system.
|
| • |
A CD/DVD or similarly easy to handle storage medium (e.g. a memory stick),
by means of which the necessary files can be copied to the target system.
|
Required Skills
In order to perform the necessary modifications to your system
you should be familiar with, or have the aid of someone that has
experience in
| • |
creating a complete system backup
|
| • |
creating a system restore point
|
| • |
starting, stopping, and configuring services
|
| • |
configuring and using Windows Explorer or a comparable application
|
| • |
using the Windows registry editor (RegEdit.exe) (or a similar/comparable application)
|
| • |
modifying the security privileges/access rights of folders, files, and registry keys
|
| • |
configuring the third party, security (e.g. anti-virus, firewall, etc.) application(s),
if present.
|
| • |
removing and installing applications and Windows features
|
Legal Aspects
Provided, that use of the pre-Windows 10, donor system is discontinued
after the transfer of the necessary files, their use, in this form,
should be compliant with the license terms.
But, we're no legal experts on international, copyright laws
and even less so, on their interpretation in your country.
So, if in doubt, consult one first.
Security Considerations
Due to certain features that are an inherent part of the functionality of
Windows Help, the use and presence of a funcitonal WinHlp32 installation
may in itself weaken system security .
The seucrity modifications necessary to install the WinHlp32 file(s),
as described in this document, reduce it even further.
This leads to the situation that a decision
has to be made in favor of either preserving system security
or the ability to open Windows Help (.hlp) files.
Unfortunately, in this case, a compromise doesn't exist.
Even if the level of risk to which your system is/will be exposed
depends on its configuration and the environment in which it is used
(e.g. corporate, private, permanently or never connected to the Internet, etc.),
this should be considered and borne in mind, prior to continuing.
So be warned !
By applying the installation method described below,
you will degrade system security. You do so at your own risk.
Basic Procedure
Basically, the entire procedure consists of
| 1. |
Renaming (or deleting) WinHlp32.exe under Windows 10
|
| 2. |
Renaming (or deleting) WinHlp32.exe.mui under Windows 10
|
| 3. |
Copying WinHlp32.exe under Windows Vista
|
| 4. |
Copying WinHlp32.exe.mui under Windows Vista
|
| 5. |
Copying ftsrch.dll under Windows Vista
|
| 6. |
Copying ftsrch.dll.mui under Windows Vista
|
| 7. |
Exporting the HKKEY_LOCAL_MACHINE\Software\Classes\.hlp and
HKKEY_LOCAL_MACHINE\Software\Classes\hlpfile keys under Windows Vista
|
| 8. |
Transferring the copied and exported files from Vista to Windows 10
|
| 9. |
Adding the WinHlp32.exe version copied from Windows Vista to the Windows
folder under Windows 10
|
| 10. |
Adding the WinHlp32.exe.mui version copied from Windows Vista to the
corresponding folder under Windows 10
|
| 11. |
Adding the ftsrch.dll version copied from Windows Vista to the
corresponding folders (C:\Windows\System32 and C:\Windows\SysWOW64)
under Windows 10
|
| 12. |
Adding the ftsrch.dll.mui version copied from Windows Vista to the
corresponding folders under Windows 10
|
| 13. |
Importing the exported registry keys into the registry under Windows 10
|
and this would hardly have merited any further comment under most legacy,
NT versions.
However, with the considerably more restrictive seucurity policy, 32-bit application
and side by side assembly support, implemented under 64-bit, Windows 10 versions,
things aren't quite as easy as they used to be.
Preparatory Steps and Precautionary Measures
The following steps should/must be performed prior to making the
actual modifications to the target (i.e. the Windows 10) system.
On the donor system
| 1. |
If you have chosen a Windows Vista installation to be your donor system but
haven't installed the WinHlp32 update yet, download a
Windows6.0-KB917607-x86XX.msu
standalone setup package.
|
| 2. |
As you may have to log on under an administrator account or provide
an adminstrator account password later, disconnect the computer from all public networks (e.g. the Internet),
if possible physically (for example, by unplugging the network cable or by switching off the router/modem).
|
| 3. |
Log on to your user account on the designated donor system (e.g. Vista).
|
| 4. |
If your donor system is Windows Vista and you haven't installed the Windows6.0-KB917607-x86XX.msu ,
Windows Help update yet, you should install it now.
The Installed Updates window (expand and see first image under the Illustrations section, below)
should now also include KB917607 in the listed updates.
|
| 5. |
Configure Windows Explorer to display all files, including, system, hidden,
as well as the extensions of files with known extensions
(i.e. check "Show hidden files and folders",
uncheck "Hide extensions for known file types"
and "Hide protected operating system files" in the
"Folder Options" dialog.
|
On the target (i.e. the Windows 10) system
| 1. |
If you have only the donor and target computers at your disposal,
download or make all Windows 10, help documents you may require available offline.
You may not be able to access them again, prior to having completed the modifications.
|
| 2. |
Disconnect the computer from all public networks (e.g. the Internet),
if possible physically (for example, by unplugging the network cable
or by switching off the router/modem).
Even if your anti-malware/security applications are up to date and running:
You do NOT want your system to be attacked while you are logged on with
full access to the operating system files !
You do NOT want automatic updates to interfere
(for example, by invoking restore points or rebooting)
with the changes you're making to your system !
|
|
In most cases, users
under Windows 10 Home Edition will only have one user account
and this account normally has adequate privileges and access rights to perform
all of the following prepatory steps, as well as the actual modifications.
Nonetheles, you may be required to provide a password or confirm certain
of the following actions/operations, under such systems.
Under other Windows editions (e.g. Pro) you may have several user accounts
with varying privileges and access rights.
In this case, it is good practice to use the account with the minimum privileges
and access rights required to perform a task (For example you do not need to be
logged on as Administrator to preview a picture in the public/shared, documents folder,
your normal user account would normally suffice).
|
| 3. |
Activate Airplane Mode
(i.e. de-activate all wireless network connections).
This is a precautionary measure, meant to ensure
that no connections can be established to other computers, smart/cell phones, etc.
(see step 2, above).
|
| 4. |
Create a backup of your operating system partition.
You should also create a (bootable) rescue disk as part of the backup.
These are precautionary measures that can be skipped if you create such backups
regularly (e.g. weekly/daily) and you feel confident
that you can restore your Windows 10 system without it.
|
| 5. |
Create a system restore point. We strongly recommend not to skip this step,,
as it simplifies restoring the system to its prior state considerably.
|
|
As of here, you will generally (alt. normally) require administrator privileges.
|
| 6. |
Under the account, under which you intend to
perform the remaining steps on the target system,
configure Windows Explorer to display all files, including, system, hidden,
as well as the extensions of files with known extensions
(i.e. check "Show hidden files and folders", uncheck "Hide extensions for known file types"
and "Hide protected operating system files" in the
""Folder Options" dialog.
|
| 7. |
In Windows Explorer or any other application in which you can list and define
the properties of folders and files, open the Windows 10 root folder.
Typically, this is C:\Windows,
but on computers with multiple operating systems or with site licenses,
Windows 10 may have been installed in another location
(i.e. on a different drive and/or in a different folder).
In such cases you can (either) look up %windir%
in the Environment Variables dialog under Advanced system settings or use the
SST file name conversion utility
to locate the Windows folder by expanding the %SYSTEMROOT% environment variable.
|
| 8. |
Locate and select the WinHlp32.exe file in the Windows folder
and open its Properties dialog.
|
| 9. |
In the WinHlp32.exe file's Properties dialog select the
Details tab/page and make a note of the language and sub-language.
This is probably "English (United States)", irrespective of the
language of your Windows 10 user interface
(i.e. the language in which the Windows 10 menus and messages/notifications, etc. are displayed).
However, we have only tested this under three user interface languages
,
so it may not apply to all.
As the next step requires determining and modifying the security settings that apply to
WinHlp32.exe and these can be accessed from the file's Properties dialog,
do not close the one you've opened in this step yet.
|
| 10. |
If, on the "Security" tab/page of the "Properties" dialog, the account with administrator privileges,
under which you are logged on, does not have "Full control"
permissions over WinHlp32.exe,
open the "Advanced Security Settings" dialog by clicking on the "Advanced" button
at the bottom of the Security tab sheet.
|
| 11. |
At the top of "Advanced Security Settings" dialog, click the "Change" link.
This will open the "Select User or Group" dialog.
|
| 12. |
On the "Select User or Group" dialog click the "Advanced" button.
This will open an "extended version" of the dialog.
|
| 13. |
Click the "Find Now" button on the extended version Select User or Group dialog
to list the available users and groups from which the new owner of the file
can be chosen.
|
| 14. |
Select the administrator account name, under which you should be/are logged on,
and close the extended version of the "Select User or Group" dialog
by means of its OK button.
This should enter <computername>\<admin account name> (without the > and >)
in the "Enter object name to select" multi-line edit field of the
"Select User or Group" dialog opened first.
Now, also close this dialog by means of the OK button.
|
| 15. |
Close all dialogs you opened by means of buttons and other controls on the WinHlp32.exe's Properties dialog.
Finally, also close the Properties dialog itself.
|
| 16. |
Reopen the WinHlp32.exe's Properties dialog and on the "Security" page
open the "Permissions for WinHlp32.exe" dialog by clicking the "Edit" button.
|
| 17. |
In the "Permissions for WinHlp32.exe" grant full control to the currently logged on user
or the group of which the user account is a member of.
|
| 18. |
Close both the "Permissions for WinHlp32.exe" and the WinHlp32.exe's
Properties dialogs by clicking the OK buttons.
|
| 19. |
Rename WinHlp32.exe to something like
WinHlp32_Win10Original.exe
Note that by preserving the first part of the name, the file can be
located more easily, in the event that a temporary, manual roll-back should become
necessary later on.
Should renaming the file fail (repeatedly),
make a note of the exact time of day and try to rename the file one, last time.
Then, check the events that were logged at the noted time in the Windows Event Viewer
and in any third party, (security) application logs (should any such programs be installed
and such logs exist).
|
| 20. |
In the same folder as WinHlp32.exe (e.g. C:\Windows),
locate and open the folder corresponding to the abbreviation of the language
and sub-language (see step 9, above).
In all likelihood the language and sub-language are English and United States.
Assuming that this is the case, the folder's name would be en-US,
resulting in the fully qualified path, typically, being C:\Windows\en-US.
|
| 21. |
The folder opened in the previous step should contain a
file with the same name as WinHlp32.exe,
but with the "additional" extension .mui.
In other words, it should contain a file named WinHlp32.exe.mui.
Select this file and open its Properties dialog.
|
| 22. |
Apply the same procedure you used to take ownership and modify the
security settings of WinHlp32.exe
to WinHlp32.exe.mui.
For details please refer to preparatory
steps 10 through, and including, 19, above.
|
| 23. |
Rename WinHlp32.exe.mui
to something like WinHlp32_Win10Original.exe.mui
|
You are now all set to perform the actual WinHlp32 installation on your Windows 10 operating system.
Installation
| 1. |
On the donor computer
open the Windows folder in Windows Explorer
or any other application in which you can list and copy files.
Under Windows XP and later, the path of the Windows folder
will be C:\Windows, in most cases.
However, under Windows 2000 (and earlier), in corporate environments
with site licenses, or on computers with multiple operating systems,
Windows may have been installed in another location. In such cases
you can (either) look it up in the Environment Variables dialog
under Advanced system settings or use the
SST File Name Conversion Utility *FNote
to locate the Windows folder by expanding the %WINDIR%
or %SYSTEMROOT% environment variable.
|
| 2. |
In the Windows folder now look for and select the WinHlp32.exe file.
If this is being performed under Windows Vista, open the WinHlp32.exe
file's Properties dialog to determine the file's language and
if the file's size is somewhere in the range described above (i.e. larger than approx. 260 KB).
The language will play an important role in some of the remaining steps.
|
| 3. |
Copy the selected file (i.e. WinHlp32.exe) into a folder
on a storage medium (e.g. a memory stick), from which you can copy it onto the Windows 10 computer.
|
| 4. |
Open the System32 folder in the Windows folder
(typically, C:\Windows\System32) and select the file
ftsrch.dll.
|
| 5. |
Copy ftsrch.dll to the same storage medium as WinHlp32.exe
and make it a read-only file.
Setting the read-only attribute prior to copying it is important,
because otherwise the Windows 10 security mechanisms might delete or quarantine the file as
soon it is copied into the target folders.
|
| 6. |
Under Vista, now open the (sub-)folder immediately below the Windows folder,
that corresponds to the abbreviation(s) of the language
(and sub-language) of WinHlp32.exe.
For example; if the language of WinHlp32.exe is English as in
Fig. 2.4.2.0.1.1.0.16 and the sub-language is United States
(see Illustrations section, below),
then you'd have to look for and open folder C:\Windows\en-US
(assuming Windows was installed under C:\Windows).
If the language and sub-language were French and France C:\Windows\fr-Fr.
For the language and sub-language German and Germany C:\Windows\de-De,
and so on.
|
| 7. |
In the folder opened in the previous step (6.) select the files named
WinHlp32.exe.mui and ftsrch.dll.mui.
Copy both files into the sub-folder of the folder you created
to store WinHlp32.exe.mui in step 3.
For the same reason as in step 5, you should also set the file system attributes of
ftsrch.dll.mui to read-only.
Then rename the sub-folder into which you just copied WinHlp32.exe.mui
and ftsrch.dll.mui to
the same name as the source of the copy operation (e.g. if you copied it from
C:\Windows\en-US, rename the sub-folder on the storage medium with which
you intend to transfer the files to the Windows 10 computer to en-US).
This step can obviously be skipped if the donor system is a pre-Vista Windows version.
|
| 8. |
Run/open the Windows registry editor, RegEdit.exe.
|
| 9. |
In the tree view, of the registry editor's main window, open the
Software key under the HKEY_LOCAL_MACHINE key.
|
| 10. |
Under the HKEY_LOCAL_MACHINE\Software key, opened in the previous step,
open the Classes key and then select the .hlp key.
Make a note of the data assigned to the key's Default value, displayed in
the registry editor's right pane/window. Normally, this is hlpfile and
all further instructins are based on the assumption that this is the case.
|
| 11. |
Export the HKEY_LOCAL_MACHINE\Software\Classes\.hlp key
to a file on the same storage medium as the WinHlp32.exe file.
|
| 12. |
Under the same parent key as the .hlp key,
that is HKEY_LOCAL_MACHINE\Software\Classes,
select and export the hlpfile key to a file
on the same storage mediium as the other files that need to be copied onto the target system.
|
| 13. |
Copy one or more Windows Help help (.hlp) files you are familiar with into a folder
on the same storage medium with which you intend to transfer the files onto the
target (i.e. Windows 10) system.
|
|
The structure and contents of the folder to which you have copied and exported
the WinHlp32 files and registry data should now look something like this.
|
Folder PATH listing for volume SSTMEMSTICK12
Volume serial number is 9029-A4ED
H:\
\---WinHlp32ManualInstall
    +---Registry Files
    |       HKLMWinHlp32_hlp.reg
    |       HKLMWinHlp32_hlpfile.reg
    |
    +---TestFiles
    |       sock2.hlp
    |       win32.hlp
    |       win32s.hlp
    |       win32sdk.hlp
    |
    \---Windows Folder Files
        |   winhlp32.exe
        |
        \---System32
        |       ftsrch.dll
        |
        \---de-De
                winhlp32.exe.mui
ftsrch.dll.mui |
|
This listing/output was generated by specifying
"tree H: /F /A" (without the quotation marks)
on the command line ("H:" being the logical drive in which the
USB
memory stick was located).
|
|
At this point you have completed all necessary steps on the donor system.
You can now remove the storage medium referred to above and insert it
into your Windows 10 computer or transfer the folders and files onto the target system
by any other means at your disposal.
|
|
Note, whereas
WinHlp32.exe and WinHlp32.exe.mui have to be copied to different folders,
but each file has to be copied to only a single location on the 64-bit, target system,
both, ftsrch.dll and ftsrch.dll.mui,
have to be copied to two locations (each).
|
| 14. |
Copy the WinHlp32.exe from the donor system
into the folder on the target system, in which the Windows 10 version was renamed
(typically, C:\Windows,
see
preparatory step 7
and following, above).
|
| 15. |
If the WinHlp32 version to be installed was developed for and requires
the Multilanguage User Interface,
copy the files WinHlp32.exe.mui and ftsrch.dll.mui
into the folder,
immediately below the Windows folder, that corresponds to the language and sub-language
code of the source files. If a folder with the respective name does not exist
in the Windows folder, simply create it.
For example: If the language and sub-language of the source files
were German and Germany and you wanted to install WinHlp32 on a French,
Windows 10 version, there would probably be no folder named
de-De, immediately below the Windows folder
(i.e. it is unlikely that the path C:\Windows\de-De
already exists on the French system) and you would have to create it.
However, because the language and sub-language of the Windows 10 dummy installation
appear to always be English and United States, a folder named
en-US probably does exist and you could simply
paste WinHlp32.exe.mui into it,
if WinHlp32.exe and WinHlp32.exe.mui were US English versions.
|
| 16. |
Open the 64-bit version of the System32
folder (typically C:\Windows\System32) and copy
ftsrch.dll into it.
|
| 17. |
Now, open the 32-bit version of the system
folder (typically C:\Windows\SysWOW64) and copy
ftsrch.dll into this folder as well.
|
| 18. |
Open the 32-bit version of the Multilanguage User Interface folder
to which you copied WinHlp32.exe.mui and ftsrch.dll.mui
in Step 15. The name of the folders are identical, only that the
32-bit version is located in C:\Windows\SysWOW64 instead of
C:\Windows\System32. In other words, if you copied
the two files to C:\Windows\System32\de-DE, you should
also copy ftsrch.dll.mui to
C:\Windows\SysWOW64\de-DE.
If the folder doesn't exist, simply create it.
|
| 19. |
Open/run the (64-bit version of the) Windows registry editor (Regedit.exe)
and import the .hlp registry data, by opening the file to which it was
exported in installation step 9, above.
|
| 20. |
Verify that the data was imported correctly by comparing the data in the Windows 10
HKEY_LOCAL_MACHINE\Software\Classes\.hlp registry key to that under
the same key on the donor system.
|
| 21. |
In the application you used for the two, previous steps,
import the hlpfile registry data, exported in
step 10.
|
| 22. |
Verify that the data was imported correctly and close the registry editor.
|
| 23. |
Reset/deactivate Airplane Mode and restore any other
(e.g. network, security, Explorer, etc.) settings, you may have
changed, to their state prior to having performed any
of the described steps.
|
| 24. |
Test the installation by opening several .hlp files, preferably by
various means; directly in WinHlp32.exe, from the shell (i.e. Windows Explorer),
and indirectly, through an application (in as far as already available/installed).
|
A Few Final Remarks and Tips
| • |
If you have a spare, pre-Windows 10 Windows version, but no
hardware to install it on, you can install it under Hyper-V
on your Windows 10 computer.
Unfortunately, Hyper-V apparently doesn't ship with
all Windows 10 editions (e.g. Home) or it may not have been
installed together with the other Windows features that are
installed per default.
If you're uncertain with respect to either,
you can determine which of the two is the case
in the "Turn Windows features on or off" dialog
under "Programs and Features".
Should your Windows 10 edition not include Hyper-V,
you can either upgrade Windows (online) or acquire one of
several third party applications that provide more or less
the same functionality as does Hyper-V.
|
| • |
Although this did not appear necessary on our systems:
If after having taken ownership and modified the security settings of the
original Windows 10 files, you are still prevented from renaming them,
temporatily deactivating system protection
(i.e. "Automatic restore points" on the "System Protection" tab of the
"System Properties" dialog) while performing
preparatory steps 10 through and including 22
on the Windows 10 target system may help.
|
| • |
If the original files are restored after rebooting, setting the
system and read-only attributes on the file(s) PRIOR to copying it/them
into the destination folders (e.g. C:\Windows) on the Windows 10 system may help.
Unfortunately, on systems on which Windows Resource Protection is in force,
this can not be done in/from Windows Explorer and/or while the file(s)
is/are still in its source folder on the donor system or in the destination
folder(s) on the target system
(i.e. it is necessary to add these attributes in a command line window
and in another folder, for example on an external storage medium).
|
| • |
If you use a command line window (either cmd.exe or the Windows PowerShell),
be sure to use a 64-bit and not a 32-bit version, as the 32-bit version may
map/redirect certain operations to locations other than the intended.
|
| • |
Although it does not provide the same level of protection as does ownership
by TrustedInstaller, once you've completed and tested the installation,
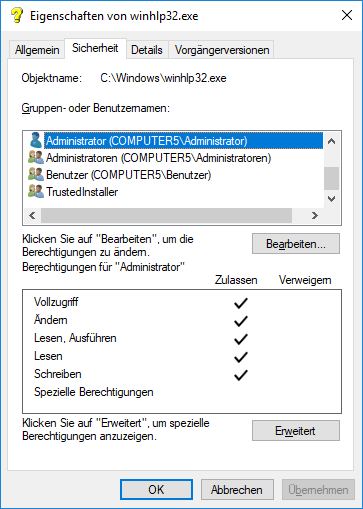
transfer/set ownership to a rarely or never used user account and revoke all but
read and execute permissions for all other users and groups except TrustedInstaller.
|
| • |
By adding auditing options (see second tab/page of the Advanced Security Settings dialog)
to the security settings of the added file(s)
and regularly checking the Windows event log subsequently,
the introduced security flaw cannot be (entirely) offset
but at least somewhat mitigated, in that access and manipulation attempts can be detected.
|
| • |
It is not uncommon that pre-installed OEM Windows versions
ship with third party, security software, that is installed,
together with the operating system, by the hardware manufacturer or vendor.
This security software can be so effective in preventing changes to
system folders and/or files, that it has to be deactivated
(for example by stopping or deactivating the service) or even
uninstalled, prior to making changes to protected files.
|
To show/expand or hide/collapse the Illustrations section,
click the chevron (>) at the end of the line, above this text.
Note, that the illustrations in this section are not printed
unless it is explicitly expanded prior to printing.
|
Fig. 2.4.2.0.1.1.0.2
|
|
|
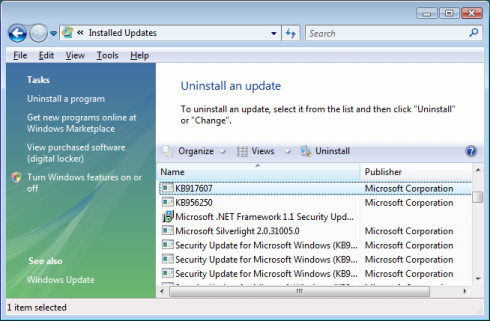
Preparatory step 4 on donor system.
|
|
The Vista Installed Updates window/view,
with the update required to open/display Windows Help (.hlp) files
(Windows6.0-KB917607-x86.msu) selected/highlighted.
|
|
|
Fig. 2.4.2.0.1.1.0.3
|
|
|
|
|
|
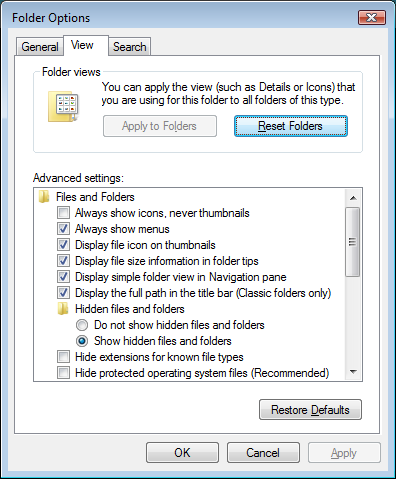
The Vista Folder Options Dialog with the
"Advanced settings" options on the "View" tab
|
|
Fig. 2.4.2.0.1.1.0.4
|
|
|
|
|
|
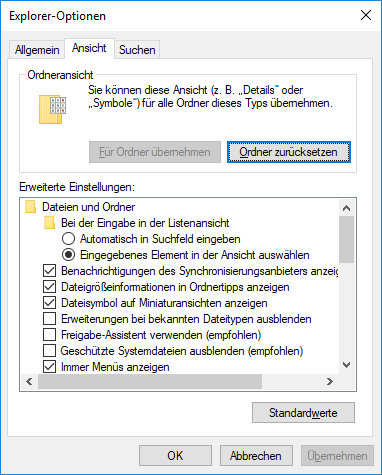
The Windows 10 Folder Options Dialog with the
"Advanced settings" options on the "View" tab
|
|
Fig. 2.4.2.0.1.1.0.5
|
|
|
|
|
|
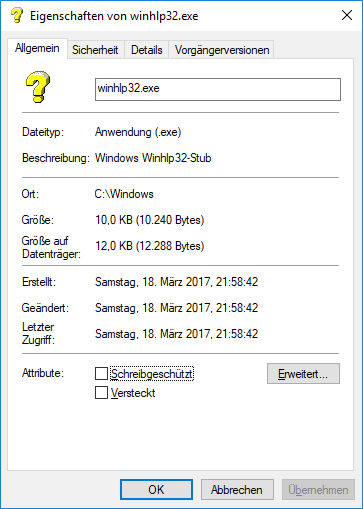
The General tab/page of the Windows 10 Properties dialog,
prior to renaming the original, Windows 10 WinHlp32.exe.
Note, that the size ("Größe:") is a mere
10 KB (10.240 bytes).
|
|
Fig. 2.4.2.0.1.1.0.6
|
|
|
|
|
|
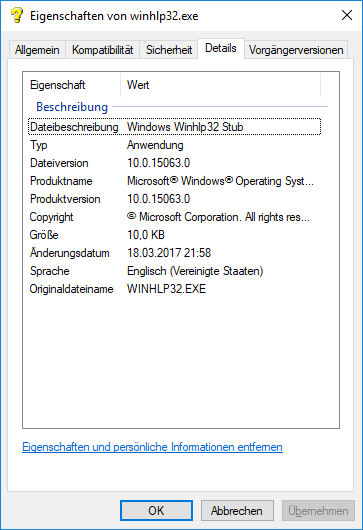
The Details tab/page of the Windows 10 Properties dialog,
prior to renaming the original, Windows 10 WinHlp32.exe.
Note, that the file's language and sub-language are English and United States
("Sprache: Englisch (Vereinigte Staaten)"), even though
the language of the Windows user interface is German.
|
|
Fig. 2.4.2.0.1.1.0.7
|
|
|
|
|
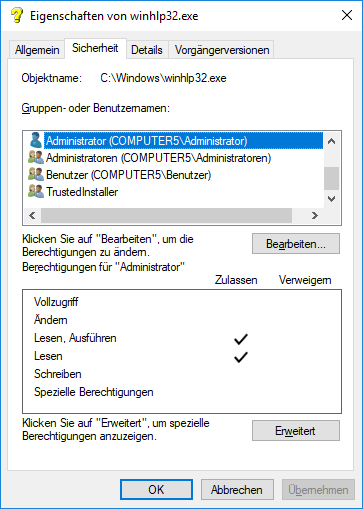
The Security tab/page of the Windows 10 Properties dialog,
prior to changing the owner and renaming the original,
Windows 10 WinHlp32.exe file.
Note, that the built-in administrator account does not (yet) have
full control over the file.
|
|
|
|
Fig. 2.4.2.0.1.1.0.8
|
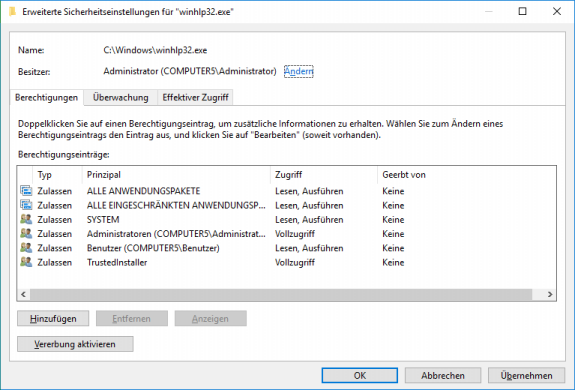
Preparatory steps 10
and 11 on target system |
|
|
The Windows 10 Advanced Security Settings for WinHlp32.exe dialog,
prior to renaming the original, Windows 10 file.
|
|
|
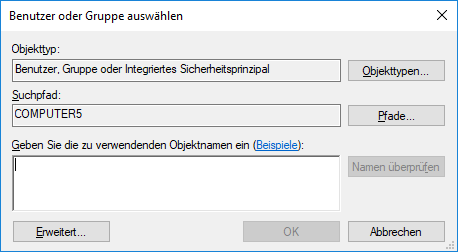
Fig. 2.4.2.0.1.1.0.9
Preparatory steps 11 & 12 on target system
|
|
|
|
|
|
The Windows 10 Select User or Group dialog, prior to having selected
a new owner for the original, Windows 10 WinHlp32.exe.
|
|
|
|
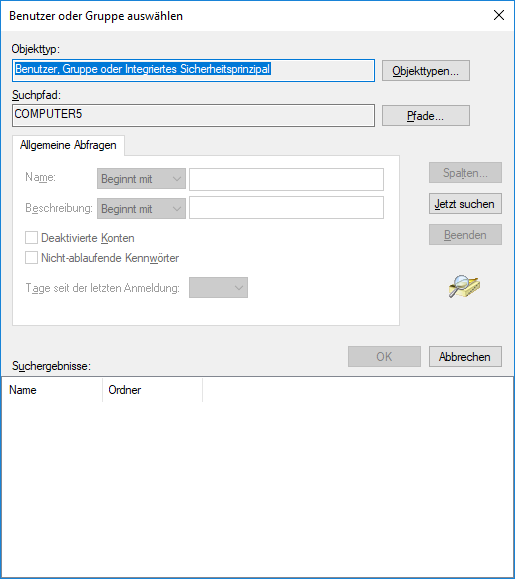
Fig. 2.4.2.0.1.1.0.10
|
Preparatory step 13 on target system.
|
|
|
The extended version of the Windows 10 Select User or Group dialog,
prior to having selected a new owner for the original,
Windows 10 WinHlp32.exe.
|
|
|
|
|
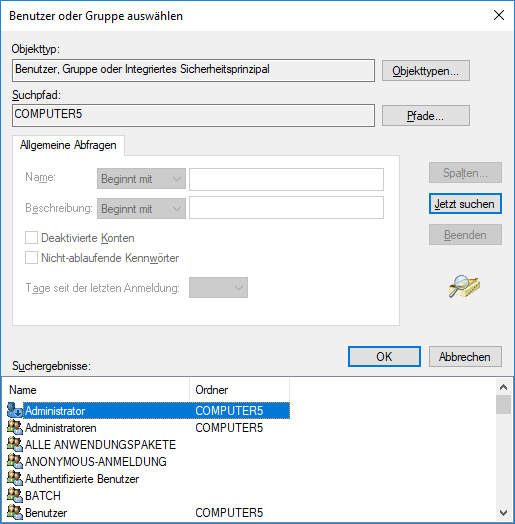
Fig. 2.4.2.0.1.1.0.11
|
Preparatory step 14 on target system.
|
|
|
The extended version of the Windows 10 Select User or Group dialog,
now, with the user account that was selected to take
ownership of the original, Windows 10 WinHlp32 file.
|
|
|
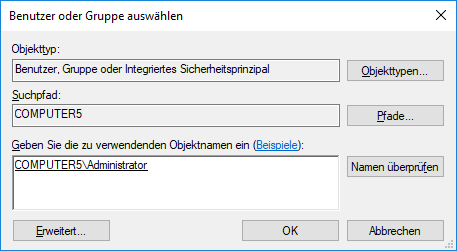
Fig. 2.4.2.0.1.1.0.12
|
|
|
|
|
|
The Windows 10 Select User or Group dialog, after having
entered/selected the user account ("COMPUTER5\Administrator"),
chosen to be the new owner of the original, Windows 10 WinHlp32.exe file.
|
|
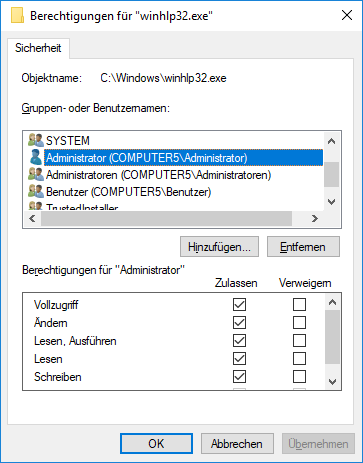
Fig. 2.4.2.0.1.1.0.13
|
|
|
|
|
|
The Windows 10 Permissions for WinHlp32.exe dialog, with the
account entered/selected in the Select User or Group dialog,
(see Fig. 2.4.2.0.1.1.0.12) highlighted in the upper pane.
The check boxes in the lower pane can be used to
view and/or change the permissions granted to the user selected
in the upper pane.
|
|
Fig. 2.4.2.0.1.1.0.14
|
|
|
|
|
|
The Security tab/page of the Properties dialog,
immediately prior to being closed, but after having granted full control
over the original. Windows 10 WinHlp32 file to the
computer's built-in administrator account.
|
|
Fig. 2.4.2.0.1.1.0.15
|
|
|
|
|
|
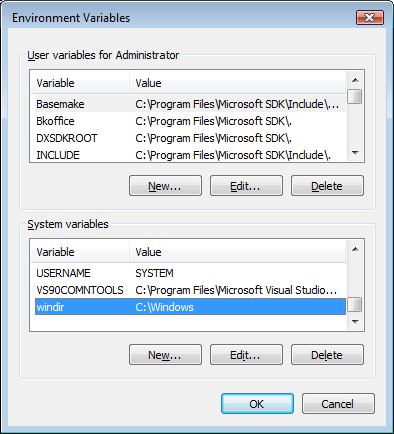
The Windows Vista Environment Variables dialog with the value
assigned to the %WINDIR% environment variable highlighted in
the lower pane.
|
|
Fig. 2.4.2.0.1.1.0.16
|
|
|
|
|
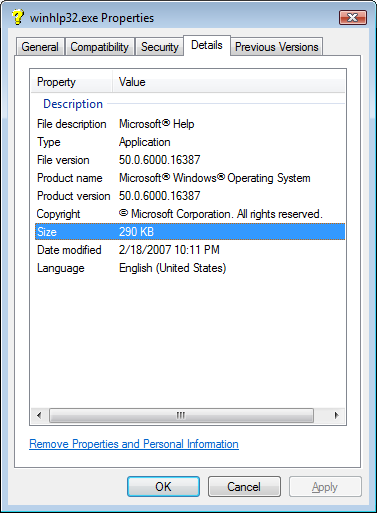
The Details tab/page of the (Windows Vista) Properties dialog,
showiing the relevant characteristics of the WinHlp32.exe file
that was installed by the KB917607 update for Windows Vista.
Note the file's version ("50.6000.16387"), size ("290 KB"),
and description ("Microsoft® Help").
|
Footnotes
|
*1
|
For further details on the RTF (.rtf) help file standard please
refer to the pertinent documents on the
Microsoft website or the respective entries in the Wikipedia
online encyclopedia.
|
|
*2
|
The two Xs ("XX") in the name are placeholders for the
two letters of the language code for which the setup package
and the files it installs were authored.
For further information on the two letter language codes please
see footnote 8, further below.
|
|
*3
|
All attempts we made to install WinHlp32,
using the (32-bit) KB917607 update packages,
under 64-bit, Pro and pre-installed, OEM, (Windows 10) editions
failed, rrespective of the language of the setup package and Windows version.
Specifically, neither the English (Windows6.0-KB917607-x86En.msu)
and German (Windows6.0-KB917607-x86De.msu), nor the international
(Windows6.0-KB917607-x86.msu) setup packages
would install WinHlp32 under French, English, or German, Windows 10 versions.
However, in this context, it should be noted that the CRC-32 checksums
of all three setup packages are identical.
Notheless, based on the returned error codes, we have reason to believe
that it might (still) be possible to trick the Vista update into performing as it should.
|
|
*4
|
To start with the functionality of the Microsoft WinHlp32 application would have
to be analyzed.
This would require testing and documenting how the application
displays and handles different help files and the elements (e.g. links)
within these files.
Because not all languages are written and read from left to right and use
differnent character sets (e.g. Latin, Greek, Cyrrilic, Chinese, etc.),
this would also have to be done in, at least, several languages
(e.g. English, French, Greek, Russian, Chinese, Hebrew, Arabic, etc.).
Then, more than 20 windows and dialogs would have to be designed without
copying the Microsoft originals
(multiply this by the, at least, several dozen languages in which Windows is available
and this in itself would be quite a project).
Finally, the functionality would have to be implemented, tested,
packaged and distributed.
|
|
*5
|
Using the described procedure we were able to successfully
implement/install a functional Windows Help (WinHlp32)
under 64-bit Pro(fessional), as well as pre-installed,
OEM, Home editions.
Furthermore, neither the language of WinHlp32.exe, nor that of the Windows 10 version/user interface
seemed to have a negative effect on the functionality.
|
|
*6
|
Whereas the sizes of the dummy, WinHlp32 files that are installed
as part of 64-bit, Windows 10 releases, always seem to be identical,
WinHlp32.exe having a size of 10 KB (10,240 bytes) and
WinHlp32.exe.mui of 3 KB (3,072 bytes),
the size(s) of the file(s) that was/were installed either.
as part of the operating system or an update, under previous Windows versions,
depends on the Windows Help version and the language for which this/these file(s)
was/were built.
Typical sizes are in the range from 268 KB (274,704 bytes),
for the German, Windows 2000, to 290 KB (296,960 bytes) and 30.5 KB (31,232 bytes),
for the Vista, KB917607 update, in its US English version.
|
|
*7
|
The difficulty in eliminating the security loopholes in Windows Help
may well be one reason (amongst others) for the reluctance of Microsoft
to provide a WinHlp32 update for Windows 10.
|
|
*8
|
The two letter language codes used to abbreviate a setup package's or
executable file's language are defined in ISO 639-1,
the country codes used as sub-language/dialect codes in ISO 3166.
Combinations of language and country code are also used to name the
folders in which language specific executable files are stored.
Additional information on language and country codes can be found
by searching the International Organization for Standardization's (ISO) website
(http://www.iso.org).
Specifically, relevant information on the aforementioned standards
was found under:
|
|
All links to the ISO website were last tested and verified on May 22, 2022.
|
|
*9
|
Actually, a file extension is only that part of a file name that comes after the last period.
All other portions of the name, separated by periods, are considered part of the name
and not an/the extension.
|
|

|


