|
Setup Launcher Version 1.2 |
|---|---|
| Help & User Guide |
|
This page describes and provides instructions (with examples) on how the SST Setup Launcher
can be used to install a product under all, potentially supported operating system versions.
However, it has to be emphasized that this information is general in nature and
not all products will always support all operating systems referred to on this page.
Nor is it likely that all setup package types will always be available for all
products.
Furthermore, it is assumed that the reader is already acquainted with the potentially available
setup package and the possible installation types, as described under
Setup Package Types
and
Installation Types.
|
|
Running the Setup Launcher
Like any other binary, Windows executable the SST Setup Launcher can be opened/run
from pratically any location, including our web server on the Internet.
However, the actions/functions that can be performed
very much depend on the
Setup Package Type
for which the Setup Launcher was built and
where it is being run from.
For example, it is not possible to display the
Command Line Switches Help Dialog,
if the Setup Launcher is opened/run from our web site.
Therefore, unless you merely want to try out our software, we recommend to
download the setup package and save it to a disk on your computer or network, rather than installing
the software online. This also provides greater flexibility, with respect to the other functions
that can (then) also be performed with the Setup Launcher.
|
| • | Running the Setup Launcher from our Internet Server | |
| In many, if not most cases, it is possible to open/run the Setup Launcher from our Internet server and execute an installation online. However, whether or not this is possible depends on the setup package types made available by us, your Windows version, your Internet browser (e.g. Microsoft Internet Explorer, Microsoft Edge, Firefox, Opera, etc.) version, and the security measures and policy in force, on the system or network from which our website is accessed. The easiest way to determine whether or not it is possible to perform an installation online from your computer, is trial and error. | ||
| 1. |
Open the "Downloads" page of the product you would like to install in your Internet/web browser.
In as far as one or more setup packages for a particular product are already avaialable,
the index page of the product will contain a link to a "Downloads" page (or pages)
on/from which a setup package (or setup packages) can be opened/run or downloaded.
For software applications, the index pages of our products currently (March 2023)
adhere to the following schema https://www.stoelzelsoftwaretech.com/products/applications/sstnewapp/Index.htm "sstnewapp" being herein a placeholder for the real name of an SST application. |
|
| 2. |
On the downloads page (which may also be named "Download Details") of the desired product,
click on the Download Button of
the web setup package. As already stated we do not recommend performing an online installation
with other setup packages.
Depending on your Internet browser and the security measures implemented on your system
you may be prompted to select whether to run the Setup Launcher or save it to disk. You may also be
prompted whether or not to trust the publisher (i.e. Stoelzel Software Technologie).
|
|
| 3. | Wait for the SST Setup Launcher's Main/Progress Dialog or another (Setup Launcher) dialog to be displayed. | |
|
IMPORTANT !
For practical and technical reasons the Setup Launcher downloads and extracts
the Microsoft Installer component(s) to the folder it is being run from.
In order to subsequently perform the installation, the Setup Launcher requires the downloaded
or extracted files within milliseconds (in other words, immediately) !
It is therefore imperative that the user account, under which the web/Internet or self-extracting
version of the Setup Launcher is being run, has the following access rights/permissions to
the folder and files in which it is located:
Even if it will not cause the Setup Launcher to crash if these access rights/permissions are not given,
it is almost certain that the installation (and/or any other of the supported functions) will fail.
For the same reasons as above,
the total length of any path, including the Setup Launcher's name and suffix
(even if the suffix is not specified), may not exceed 259 characters.
This includes all blanks, quotation marks, backslashes, and any other characters that may occur in a path.
The restriction also applies to paths passed to the Setup Launcher as
command line parameters.
In this context, it is also important to bear the following two points in mind:
Because in most cases Windows Explorer is configured to omit certain parts of a (file) name,
uses aliases for special folders, and/or links to particular locations,
this may not be immediately apparent.
Therefore, we strongly recommend that when downloading a setup package
that it is saved to a folder below the root, but as high up in the folder
hierarchy and with as short a name as possible.
Provided it wasn't moved, the public downloads folder
(under Windows Vista and later, typically C:\Users\Public\Downloads\) generally fulfills all the above
criteria and is therefore a good choice.
|
| • | Running the Setup Launcher from a Local Drive on Your Computer | |
| 1. | After having downloaded the Setup Launcher of the setup package from/with which you want to perform the installation from our website, open the folder to which the the Setup Launcher and/or setup package were saved (e.g. C:\Users\Public\Downloads). in Windows (File) Explorer. | |
| 2. | Double click on the icon of the Setup Launcher. | |
|
Running Multiple Instances of the Setup Launcher
For technical reasons, Microsoft does not permit performing more than one
Microsoft Installer*1
installation at a time.
We have therefore implemented a safeguard in the Setup Launcher that ensures that
only one instance of the Setup Launcher can be used to install a product at any given time.
If you attempt to perform multiple installations simultaneously,
all instances of the Setup Launcher, except the first, will display a dialog that
informs you that an installation is already in progress.
Nonetheless, it is possible to run multiple instances of the Setup Launcher to perform
other tasks. For example, you could use the Setup Launcher of a web setup package to
download that product's .msi (or .msp) file, while letting the Setup Launcher of a
self-extracting setup package extract that setup package's .msi component(s).
|
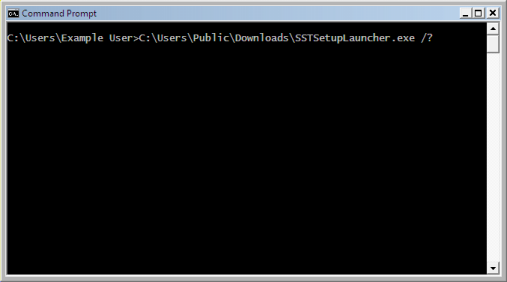
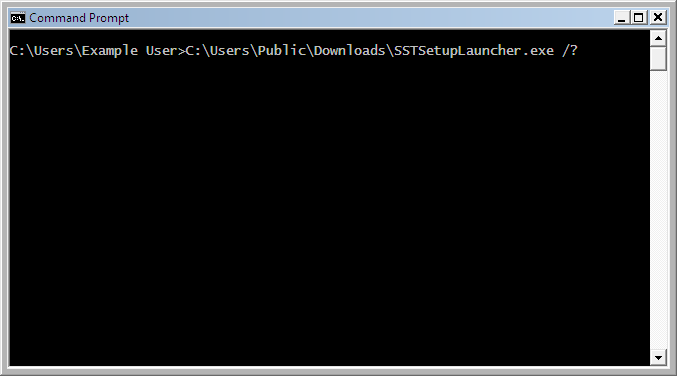
| Displaying the Command Line Switches Help Dialog |
| 1. | Open the Windows Run Dialog or a Command Prompt window. | |||
| 2. | In either the Run Dialog or the Command Prompt window enter the path and name of the Setup Launcher executable and append a space/blank and the Usage Help Command Line Switch after the last letter of the Setup Launcher executable's file name (with or without the suffix). | |||
|
If for example the Setup Launcher were located in C:\Users\Public\Downloads\
and the Setup Launcher file were named SSTSetupLauncher.exe, you would have to enter: C:\Users\Public\Downloads\SSTSetupLauncher.exe /? The result in your Windows Command Prompt window should then look similar to that in the screen shot immediately below this text. |
||||
|
||||
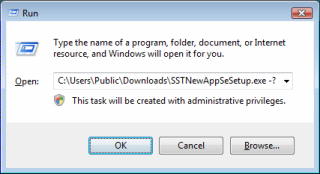
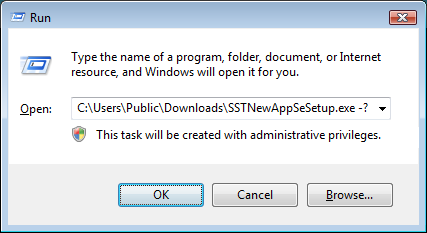
| However, in most cases it is unlikely that the file name of the Setup Launcher is SSTSetupLauncher.exe. It is far more likely that the file name under which it was published (on our website) is something like SSTNewAppEnSESetup.exe. The "SSTNewApp" portion being herein a placeholder for the real name of the product you want to install or patch. | ||||
|
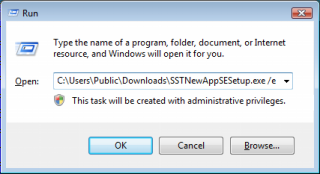
So, assuming that the name of the product is SSTNewApp, the self-extracting SST Setup Launcher
file is located in the same folder as in the previous example, and its name is SSTNewAppSESetup.exe,
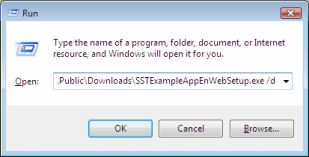
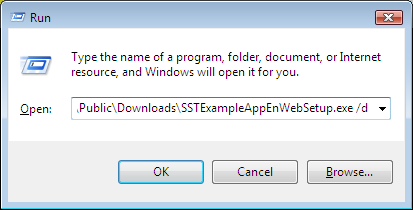
you would have to enter : C:\Users\Public\Downloads\SSTNewAppSESetup.exe -? The result in your Windows Run Dialog then ought to look similar to that in the following screen shot: |
||||
|
||||
| 3. | Finally, to execute the command, simply press Enter on your keyboard or the OK button in the Windows Run Dialog. |
| Downloading the Microsoft Installer Package |
| As already described under Setup Package Types and Command Line Switches and Parameters the Setup Launcher of web/Internet installation packages can be used to download the Microsoft Installer package/components, without installing the product(s) they contain. Downloading the Microsoft Installer package and saving it to disk (together with the Setup Launcher) has the advantage that you can archive all files that constitute the (entire) setup package and are no longer dependent on an Internet connection to install the product. |
| This is achieved by running the Setup Launcher from a command line with the Download Command Line Switch. |
| 1. | If you are not connected to the Internet, establish a connection to it. | |||
| 2. | Open the Windows Run Dialog or a Command Prompt window. | |||
| 3. | As the command line enter the path and file name of the Setup Launcher executable together with the Download Command Line Switch, according to the following schema: | |||
| <Path to executable component of the installation package>\<Name of executable setup component> -d or /d | ||||
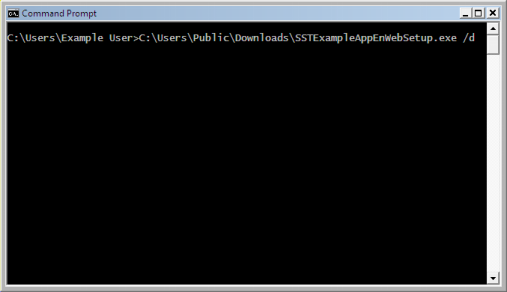
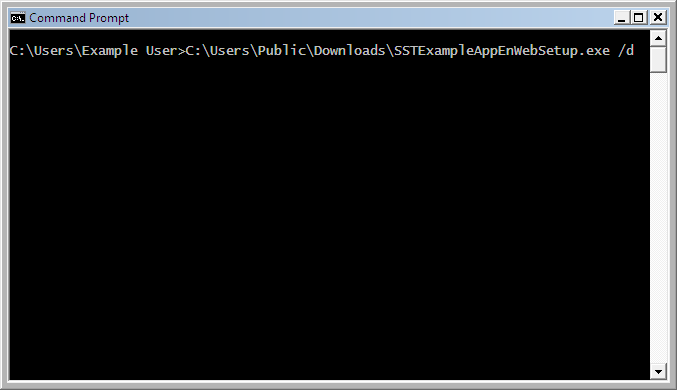
| If for example, the executable setup component (i.e. the Setup Launcher) were located in C:\Users\Public\Downloads and the name of the executable setup component (i.e. the Setup Launcher's file name and suffix) were SSTExampleAppEnWebSetup.exe, you would have to enter: | ||||
| C:\Users\Public\Downloads\SSTExampleAppEnWebSetup.exe -d | ||||
| or | ||||
| C:\Users\Public\Downloads\SSTExampleAppEnWebSetup.exe /d | ||||
| The result of this procedure should be comparable to one of the two screen shots, below. | ||||
|
||||
|
||||
| 4. | To execute the command line, press Enter on you keyboard. |
| 1. | Open the Windows Run Dialog or a Command Prompt window. | |||
| 2. | In whichever command line user interface you happen to be using, enter a command according to the following schema: | |||
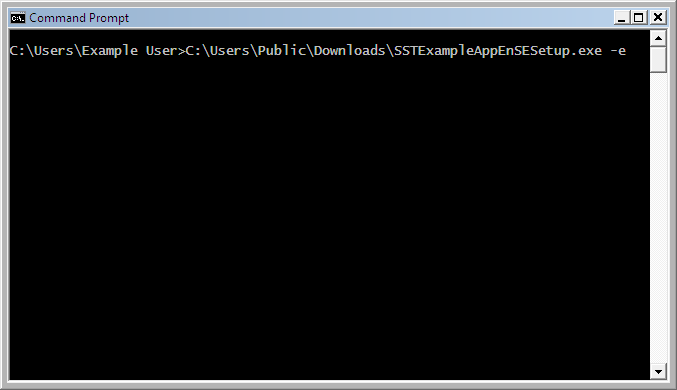
| <Path to executable component of the installation package>\<Name of executable setup component> -e or /e | ||||
| If for example, the self-extracting setup package (i.e. the Setup Launcher) were located in C:\Users\Public\Downloads and its name were SSTExampleAppEnSESetup.exe, you would have to enter: | ||||
| C:\Users\Public\Downloads\SSTExampleAppEnSESetup.exe -e | ||||
| or | ||||
| C:\Users\Public\Downloads\SSTExampleAppEnSESetup.exe /e | ||||
| In a Command Prompt window the result should look something like that in Fig. 1.1.1.2.1.1.0.851 and 1.1.1.2.1.1.0.852 | ||||
|
||||
| Note, that in order to fit the entire command line into the screen shot of the Windows Run Dialog we have shortened the name of the Setup Launcher to "SSTNewAppSESetup.exe" (without the quotation marks) in the following example. However, the self-extracting package is still located in the Downloads folder under C:\Users\Public\. | ||||
|
||||
| 4. | All that remains now, in order to execute the command, is to press Enter on your keyboard. |
| Verifying the Digital Signature on a File |
| 1. |
Open a Command Prompt window or the Windows Run Dialog.
Note, that although it is also possible to enter the command that includes
the
Verify Digital Signature Command Line Switch and parameter
in a Windows Run Dialog, we recommend
using a Windows Command Prompt window in such cases.
The reason fot this being, that the combo box of the Windows Run Dialog can only display
a very limited number of chacracters and the command lines that verify the digital signature
on a file tend to be quite long.
Because the view-ports of Windows Command Prompt windows are considerably larger, it is far
easier to enter, proofread, and edit such command lines in them than in a small dialog.
In this context it should also be noted that in the following examples all command lines are always single lines,
even if they are displayed over two or more lines.
|
|||
| 2. | Determine the file extension/suffix of the file to verify. Specifiying the full file name, that is the file name including the file extension/suffix (of the file to verfiy the digital signature on) is imperative. Failing to do so will result in the Setup Launcher displaying an error message in its Error Dialog and the trust verification will fail. | |||
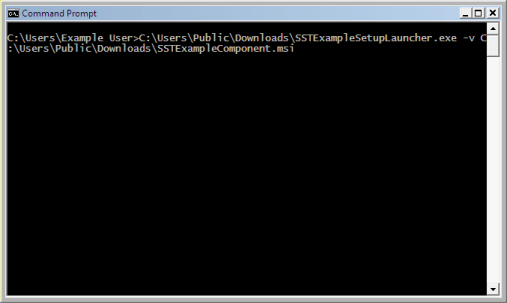
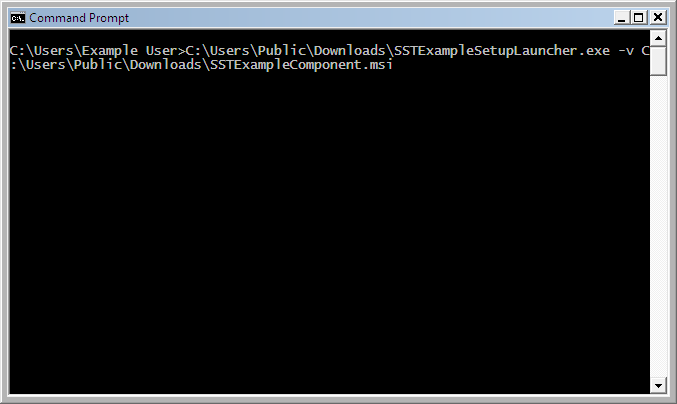
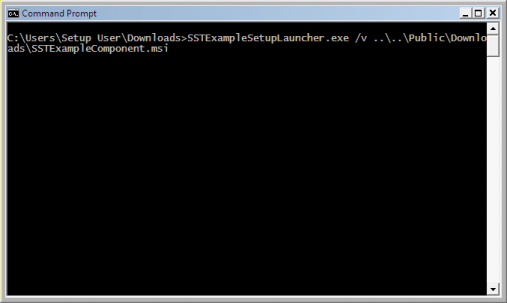
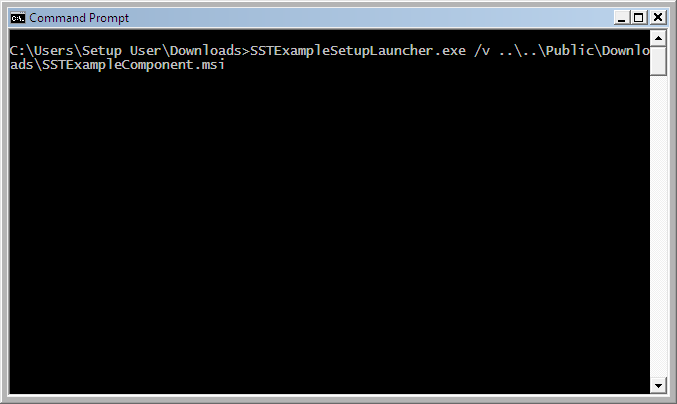
| 3. | The schema for the digital signature/trust verification command line is the following: | |||
| <Path to executable component of the installation package>\<Name of executable setup component> -v or /v <Full or relative path to the file to verify>\<Name, including the extension, of the file to verify> | ||||
|
C:\Users\Public\Downloads\SSTExampleSetupLauncher.exe -v C:\Users\Public\Downloads\SSTExampleComponent.msi
|
||||
| or | ||||
| C:\Users\Setup User\Downloads\SSTExampleSetupLauncher.exe /v ..\..\Public\Downloads\SSTExampleComponent.msi | ||||
| The result of this procedure should be comparable to one of the two screen shots, below. | ||||
|
||||
|
||||
| 4. | To execute the command line(s), press Enter on you keyboard. |
| Installing a Product by Means of a Web Setup Package |
| • | Per User Installation | |
| 1. | Run/open the SST Setup Launcher, web setup executable of the product you want to install by any one of the methods described under Running the Setup Launcher, above. | |
| 2. | If you aren't already connected to the Internet, connect to the Internet. | |
| 3. | Follow the Setup Launcher's and the Microsoft Installer packages's instructions. | |
| • | Per Machine Installation, Method 1 | |
|
Warning ! Even though the online installation is executed
under an encrypted, secure Internet conection, we explicitly
discourage Internet access under accounts with administrator privileges.
We therefore strongly recommend that you use Method 2 (below),
if you want to install a product for all users by its web setup package.
|
||
| 1. | Log off from your user/download account and log on as administrator or ask your administrator to perform the following steps. | |
| 2. | If you aren't already connected to the Internet, establish a, preferably stable, Internet connection. | |
| 3. | Run/open the SST Setup Launcher, web setup executable of the product you want to install by any one of the methods described under Running the Setup Launcher, above. The Setup Launcher will automatically proceed to perform a security check on itself and commence with the download of the Microsoft Installer package file(s). | |
| 4. | Once the Microsoft Installer package file(s) has/have been completely downloaded, the Setup Launcher will check the integrity of the downloaded file(s) and initiate the actual installation. As part of this process it will display the Query All Users Dialog which requires you to specify whether to install the software for all users or the currently logged on user only. In this dialog, check the All Users Radio Button in the Users Group Box. Close the dialog by clicking on its OK Button. | |
| 5. | Follow the SSTNewApp Setup Wizard's instructions. | |
| • | Per Machine Installation, Method 2 | |
| 1. | Log off from your administrator account and log on under a user or guest account. | |
| 2. | If you aren't already connected to the Internet, connect to the Internet. | |
| 3. | Rather than running the Setup Launcher directly from its Internet location, download and save it to a folder on a local hard disk. | |
| 4. | Using the Setup Launcher, download the setup package's Microsoft Installer package as described under Downloading the Microsoft Installer Package, above. | |
| 5. | Disconnect from the Internet. | |
| 6. | Log off from your user or guest account and log on under an account belonging to the administrators group or ask your administrator to perform the following steps. | |
| 7. | Perform a security check on the downloaded Microsoft Installer package file(s) as described under Verifying the Digital Signature on a File, above. | |
| 8. | Install the software for all users as described under Installing a Product by Means of the Microsoft Installer Package, further below. | |
| • | Administrative Installation | |
| 1. | Download the Setup Launcher of the product you want to install and save it to a folder on the hard disk of the computer you are performing the download from. Note that for an administrative installation saving the Setup Launcher to disk prior to running it is a necessity, not an option. | |
| 2. | Open a command prompt window. | |
| 3. |
In the command prompt window enter a command according to the following schema: <full or relative path to the downloaded setup package executable>\SSTNewAppWebSetup.exe /a
Example 1 (fully qualified path to web setup package):
C:\Users\Public\Downloads\New\SSTNewAppWebSetup.exe /a
Example 2 (relative path to web setup package. Your curent working directory is the root of your personal folders):
..\Public\Downloads\New\SSTNewAppSeSetup.exe /a |
|
| 4. | On the SSTNewApp Setup Wizard's "Network Location" page select or enter a folder that can be accessed by the users you want to provide access to the installation (alt. software) to. | |
| 5. | Follow the SSTNewApp Setup Wizard's instructions for the remaining steps of the administrative installation. | |
| 6. | Inform the users on your network of the newly available software and the folder specified in step 4. | |
| Installing a Product by Means of a Self-Extracting Setup Package |
| • | Per User Installation | |
| The following three steps (of this per user installation) assume that the installation is performed under a user account that does not have administrator privileges. | ||
| 1. | Download the self-extracting setup package and save it to a folder to which you have the necessary access rights/privlieges (see notes at the top of this page). | |
| 2. |
Open/run the self-extracting setup package (SSTNewAppSESetup.exe).
The package's executable component will proceed to perform a security check on itself,
extract the Microsoft Installer component(s), perform a security check on the extracted
|
|
| 3. | Follow the SSTNewApp Setup Wizard's instructions. | |
| • | Per Machine Installation | |
| 1. | Download the self-extracting setup package (SSTNewAppSESetup.exe). | |
| 2. | If the user account you are currently logged on to does not have administrator privileges, log on as an administrator, or ask your administrator to perform the following steps. | |
| 3. | Open/run the self-extracting setup package (SSTNewAppSESetup.exe). | |
| 4. |
After having performed a series of security checks on itself and
the extracted |
|
| 5. | Follow the SSTNewApp Setup Wizard's instructions. | |
| • | Administrative Installation | |
| 1. | Download the self-extracting setup package (SSTNewAppSESetup.exe). | |
| 2. | Open a command prompt window. | |
| 3. |
At the command prompt of the command prompt window, enter a command line according to the following schema: <full or relative path to the self-extracting setup package>\SSTNewAppSESetup.exe /a Example 1 (fully qualified path to self-extracting setup package): E:\New\Software\SST\SSTNewAppSeSetup.exe /a Example 2 (relative path to self-extracting setup package): ..\Software\SST\SSTNewAppSeSetup.exe /a |
|
| 4. | On the SSTNewApp Setup Wizard's "Network Location" page select or enter a folder that can be accessed by the users you want to provide access to the installation (alt. software) to. | |
| 5. | Follow the SSTNewApp Setup Wizard's instructions. | |
| 6. | Inform the users of the newly available software, its location, and how to install it. | |
| • | Common Procedures | |
| 1. | In as far it was made available by us, download the disk setup package (e.g. SSTNewAppDiskSetup.cab *3 or SSTNewAppDiskSetup.zip *3). | |
| 2. | Extract all files and folders from the (cabinet) archive file. Be sure to preserve the folder hierarchy, folder and file names, and the folder and file attributes of the cabinet archive's contents. | |
| After having extracted the contents of the archive to a folder on a hard disk, it is possible to install the software on any system supported by SSTNewApp, but the necessary procedures may vary depending on the operating system, browser, and security settings. The simplest method is to burn the extracted contents of the (.cab) archive to a CD/DVD and to subsequently install SSTNewApp from this CD/DVD. |
| • | Creating an Autorun Capable Installation Disk | |
| 1. | Simply add all extracted files and folders to the root folder of a CD or DVD. Be sure to include all hidden, system, and read-only folders and files. | |
| 2. | Burn the CD or DVD. | |
| • | Installing SSTNewApp under Windows 98 and 98 SE (Second Edition) | |
|
Note, that Windows 98 and 98 SE are legacy operating system versions, under which the
Setup Launcher can not be run.
Nonetheless, in as far as the product to be installed can be used under
these Windows versions, it can be installed by means of a disk setup package by
following the instructions below.
|
||
| 1. | Assuming the installation is being performed by means of a CD, insert the CD into the drive and close the drive. In most cases this will suffice to automatically open the CD's contents and installation information file and run the SSTNewApp Setup Wizard. However, if autorun is disabled, neither file will be opened. In this case it is necessary to open the SSTNewApp Microsoft Installer package manually. This can be achieved either by opening the contents and installation information file (Disk drive:\SSTNewAppSetup.htm) in a browser and subsequently opening the SSTNewApp Microsoft Installer package by means of the link in this file, or by running the SSTNewApp Setup Wizard (Disk drive:\Setup\SSTNewAppEN.msi) directly in Windows Explorer. | |
| 2. | Follow the SSTNeWApp Setup Wizard's instructions. | |
| • | Per User Installation under Windows NT 4.0 | |
|
Note, that Windows NT 4.0 is a legacy operating system version, under which the
SST Setup Launcher can not be run.
Nonetheless, in as far as the product to be installed can be used under
Windows NT 4.0, a per user installation can be performed by means of a disk setup package by
following the instructions below.
|
||
| 1. | Log on to the user account under/for which you would like to install SSTNewApp. | |
| 2. | Insert the CD into the drive and close the drive. Provided autorun has not been disabled, no further actions are required to open the contents and setup information file and run the SSTNewApp Setup Wizard. If, on the other hand, autorun has been disabled, both files have to be opened manually in an application such as Windows Explorer, but the contents and information file (Disk drive:\SSTNewAppSetup.htm) can also serve to open the SSTNewApp Microsoft Installer package (SSTNewAppEN.msi) located in the (compact) disk's Setup folder, which will also initiate the installation. | |
| 3. | Follow the SSTNeWApp Setup Wizard's instructions. | |
| • | Per Machine Installation under Windows NT 4.0 | |
|
Note, that Windows NT 4.0 is a legacy operating system version, under which the
SST Setup Launcher can not be run.
Nonetheless, in as far as the product to be installed can be used under
Windows NT 4.0, a per machine installation can be performed by means of a disk setup package by
following the instructions below.
|
||
| 1. | Log on to an administrator account. | |
| 2. | Insert the CD into the drive. If autorun is enabled this will automatically open the SSTNewApp Microsoft Installer package in the CD's Setup folder (Disk drive:\Setup\SSTNewAppEN.msi). However, this will initiate a per user installation, and as a per machine installation is intended, it is necessary to close the SSTNewApp Setup Wizard, prior to continuing. | |
| 3. | Open a command prompt window. | |
| 4. |
In the command prompt window enter the following command line: Msiexec.exe /i <full or relative path to the SSTNewApp Microsoft Installer package>\SSTNewAppEn.msi ALLUSERS=1 Example 1 (fully qualified path to the disk setup package): Msiexec.exe /i E:\Setup\SSTNewAppEn.msi ALLUSERS=1 Example 2 (relative path to the disk setup package): Msiexec.exe /i ..\..\Users\Administrator\SSTCDImage\Setup\SSTNewAppEn.msi ALLUSERS=1 |
|
| 5. | Follow the SSTNewApp Setup Wizard's instructions. | |
| • | Administtrative Installation under Windows NT 4.0 | |
|
Note, that Windows NT 4.0 is a legacy operating system version, under which the
SST Setup Launcher can not be run.
Nonetheless, in as far as the product to be installed can be used under
Windows NT 4.0, an administtrative installation can be performed by means of a disk setup package by
following the instructions below.
|
||
| 1. | Insert the CD into the drive close the drive. If the SSTNewApp Setup Wizard is automatically opened by the system's autorun functionality, it should be closed, prior to continuing with step 2. | |
| 2. | Open a command prompt window. | |
| 3. |
In the command prompt window enter the following command line: Msiexec.exe /a <full or relative path to the SSSTNewApp Microsoft Installer package>\SSTNewAppEn.msi Example 1 (fully qualified path to the disk setup package): Msiexec.exe /a D:\Setup\SSTNewAppEn.msi Example 2: (relative path to the disk setup package): Msiexec.exe /a Setup\SSTNewAppEn.msi |
|
| 4. | On the SSTNewApp Setup Wizard's "Network Location" page select or enter a folder that can be accessed by the users you want to provide access to the software to. | |
| 5. | Follow the SSTNewApp Setup Wizard's instructions. | |
| 6. | Inform the users of the newly available software, its location, and how to install it. | |
| • | Installing SSTNewApp under Windows ME (Millennium Edition) | |
| 1. | Insert the CD into the drive and close the drive. On systems on which autorun is enabled, this is normally all that is necessary to run the SSTNewApp disk setup package's executable component (Disk drive:\Bin\SSTNewAppDiskSetup.exe) and open the CD contents and installation information file. Otherwise, it may be necessary to open the CD's contents and installation info file (Disk drive:\SSTNewAppSetup.htm) in a browser and run the executable component by clicking on the respective link in this file, or by opening/running SSTNewAppDiskSetup.exe directly Windows Explorer. Once opened, the executable component will proceed to perform a security check on itself and the other components of the setup package, and launch the installation. | |
| 2. | Follow the SSTNewApp Setup Wizard's instructions. | |
| • | Per User Installations under Windows 2000, up to and including, Windows 11 | |
| 1. | Insert the CD/DVD into the drive and close the drive. In most cases this will suffice to automatically open the CD's contents and installation information file and run the disk setup package's executable component. However, if autorun/autoplay has been disabled or the automatic execution of the disk's software is blocked by security policy or security software, neither file will be opened. In this case it is necessary to open/run the setup package's executable component (Disk drive:\Bin\SSTNewAppDiskSetup.exe) manually. This can be achieved either by opening the CD's contents and installation information file (Disk drive:\SSTNewAppSetup.htm) in a browser and subsequently running the setup executable by means of the link in this file, or by opening SSTNewAppDiskSetup.exe directly in Windows Explorer. The executable component will then perform a security check on itself and the other components belonging to the setup package, and subsequently initiate the installation. | |
| 2. | Follow the SSTNewApp Setup Wizard's instructions. | |
| • | Per Machine Installations under Windows 2000, up to and including Windows 11 | |
| 1. | If you are currently not logged on to an administrator account, log on as administrator, or ask your administrator to perform the following steps. | |
| 2. | Insert the CD into the drive and close the drive. Unless autorun/autoplay has been disabled, or it is prevented by the system's security policy or third party, security software, this is generally all that is necessary to open the SSTNewApp disk setup package's executable component (Disk drive:\Bin\SSTNewAppDiskSetup.exe) and the contents and installation information file. In cases in which this may fail, for any of the given reasons, the executable component can be run/opened either by opening the contents and installation information file (Disk drive:\SSTNewAppSetup.htm) in a browser, and opening the executable file by means of the link in the contents and information file, or directly in Windows Explorer. | |
| 3. | After having performed a series of security checks on itself and the Microsoft Installer component file(s) on the CD, SSTNewAppDiskSetup.exe will display a dialog requiring you to specify whether to install the software for all users or the currently logged on user only. In this dialog, check the "All users" radio button. Close the dialog by clicking on its OK button. | |
| 4. | Follow the SSTNewApp Setup Wizard's instructions. | |
| • | Administrative Installations under Windows 2000, up to and including, Windows 11 | |
| 1. | Insert the CD into the drive. If this causes the disk setup package's executable component (Disk drive:\Bin\SSTNewAppDiskSetup.exe) to automatically launch the installation, it is necessary to abort it(, for example,) by clicking on the Cancel Button of any SST Setup Launcher or SSTNewApp Setup Wizard dialog. | |
| 2. | Open a command prompt window. | |
| 3. |
In the command prompt window enter a command line according to the following schema: <full or relative path to the disk setup package's executable>\SSTNewAppDiskSetup.exe /a Example 1 (fully qualified path to the disk setup package): E:\Bin\SSTNewAppDiskSetup.exe /a Example 2: (relative path to the disk setup package): Bin\SSTNewAppDiskSetup.exe /a |
|
| 4. | On the SSTNewApp Setup Wizard's "Network Location" page select or enter a folder that can be accessed by the users you want to provide access to the installation (alt. software) to. | |
| 5. | Follow the SSTNewApp Setup Wizard's instructions. | |
| 6. | Inform the users of the newly available software, its location, and how to install it. | |
| Installing a Product by Means of the Microsoft Installer Package |
| • | Per User Installation | |
| 1. | Provided your browser, security settings, and third party security software (e.g. virus scanner, firewall, etc.) have been confiugured to permit online installations, you can install SSTNewApp by opening SSTNewApp.msi via its link on the respective product's "downloads" page. Alternatively you can provide the users of your system with a link to the SSTNewApp Setup package or download the installation package to a folder that can be accessed by any user that may want to install SSTNewApp. | |
| 2. | After having opened SSTNewApp.msi, simply follow the SSTNewApp Setup Wizard's instructions. | |
| • | Per Machine Installation | |
| 1. | Download the installation package. | |
| 2. | Log off from your user/download account and log on as administrator or ask your administrator to perform the following steps. | |
| 3. | Open a command prompt window. | |
| 4. |
The command line you then have enter in the command prompt window has to adhere to the following schema: Msiexec.exe /i <full or relative path to the downloaded installation package>\SSTNewApp.msi ALLUSERS=1 Example 1 (fully qualified path to Microsoft Installer setup package): Msiexec.exe /i C:\Users\Public\SSTNewApp.msi ALLUSERS=1 Example 2: (relative path to Microsoft Installer setup package): Msiexec /i "Public\New App\SSTNewApp.msi" ALLUSERS=1 |
|
| 5. | Follow the SSTNewApp Setup Wizard's instructions. | |
| • | Administrative Installation | |
| 1. | Download the installation package. | |
| 2. | Open a command prompt window. | |
| 3. |
In the command prompt window enter a command line according to the following schema: Msiexec.exe /a <full or relative path to the downloaded installation package>\SSTNewApp.msi
Example 1 (fully qualified path to Microsoft Installer setup package):
Msiexec.exe /a C:\Users\Public\Downloads\SSTNewApp.msi
Example 2: (relative path to Microsoft Installer setup package):
Msiexec.exe /a "Public\Downloads\New App\SSTNewApp.msi" |
|
| 4. | On the SSTNewApp Setup Wizard's "Network Location" page select or enter a folder that can be accessed by the users you want to provide access to the software to. | |
| 5. | Follow the SSTNewApp Setup Wizard's instructions. | |
| 6. | Inform the users of the newly available software, its location, and how to install it. | |
|
Aborting an Initiated Action
An installation and all other actions described on this page can be
aborted/terminated/cancelled at any time, simply by pressing/clicking the
"Cancel Button"*2
on any dialog displayed either by the SST Setup Launcher
or the setup wizard that performs the actual installation (if an installation is being performed).
However, it is important that the executed application/service is given time to respond.
Although this is generally almost immediate,
depending on the initiated action and the load on your system and/or the
Internet connection, it may also take a up to several minutes.
Tip: If you're uncertain whether or not the setup program has responded
you can monitor its activity in the Windows Task Manager.
|
| *1 | The official name of the technology we use to distribute and install most of our products, is "Microsoft Windows Installer". However, the name "Microsoft Windows Installer" can easily be misinterpreted as an installation application that installs the operating system Microsoft Windows. In the interest of clarity we have therefore decided to use the term "Microsoft Installer" for this technology instead. |
| *2 | Refer to the description of the Setup Launcher's User Interface for further information on the location of "Cancel Buttons". |
| *3 | This is a completely fictitious name that does not adhere to the SST naming conventions for setup packages. If a disk setup package is available for a particular product, its name (and other details) will be published on the respective product's "downloads" (and/or "download details") page(s). Its name will also be compliant with the SST setup package naming conventions, for details on which see Identifying Setup Launcher and Package Types. |
|
Document/Contents version 1.00 Page/URI last updated on 30.03.2023 |
Copyright © Stoelzel Software Technologie (SST) 2018 - 2023 |
Suggestions and comments mail to: webmaster@stoelzelsoftwaretech.com |